How to Put Header for Continuation on Page Two
Multiple Footers on a Page
![]()
Written by Allen Wyatt (last updated November 27, 2021)
This tip applies to Word 2007, 2010, 2013, 2016, 2019, and Word in Microsoft 365
Lu is a lawyer in Australia who has now had to change to Word for work purposes. He would like to be able to put two footers on each page of his document. He is required by law to have a "liability warning" appear on all correspondence, so he has placed that warning in a footer. However, in multipage documents Lu would like a note to also appear at the bottom of each page indicating that a further page is following such as ".../2" at the bottom of page 1 to indicate that there is a page 2 to follow. He wonders how he can have a second footer to include this indicator.
The headers and footers you can include in Word are quite flexible, although that flexibility may not be apparent to someone just starting out with the program as Lu is. While Word doesn't technically allow the definition of multiple footers for any given page, there are actually several different ways that Lu's scenario can be approached, depending on his exact needs. Those needs are defined, in this case, by the number of pages in a document.
First, if the document is a single page, then you only need the liability warning to appear at the bottom of the page. That is easy; just stuff the warning into the footer and you are good to go.
If the document is multiple pages, however, then you might want the liability warning to appear only one time, such as on the first page of the document and not on subsequent pages. That is easy, too—just configure Word for a different footer on the first page of the document. Follow these steps:
- Press Ctrl+Home to move to the beginning of your document.
- Display the Insert tab of the ribbon.
- Click the Footer tool in the Header & Footer group. Word displays a gallery of pre-defined footers you could insert.
- If you already had a footer defined in your document, remove it by clicking on the Remove Footer option, near the bottom of the drop-down gallery. It is a good idea to do this so you can start with a "blank slate," so to speak.
- Click Edit Footer, near the bottom of the drop-down gallery. Word displays the footer area of the page, places in the insertion point within it, and displays the Header & Footer tab of the ribbon (Design tab in earlier versions of Word). (See Figure 1.)
- Click the Options tool in the Options group to display available footer options. (See Figure 2.)
- Click the Different First Page option. Word changes the footer indicator at the bottom of each page to indicate whether it is a First Page Footer or a regular Footer. (See Figure 3.)
- Enter the text for your liability warning in the footer area designated as First Page Footer. This will appear only on the first page of your document.
- After entering the liability warning, with your insertion at the end of that warning, press Enter so you can start a new paragraph. Now you can enter your "continuation text," as discussed in other WordTips.
- Jump to the footer area of a different page in the document, one that isn't the first page. (You can do this, if you desire, by clicking the Next tool in the Navigation group on the Header & Footer tab of the ribbon.)
- Enter your continuation text, without the liability warning, in the footer area.
- Click the Close Header and Footer tool at the right side of the Header & Footer tab of the ribbon.
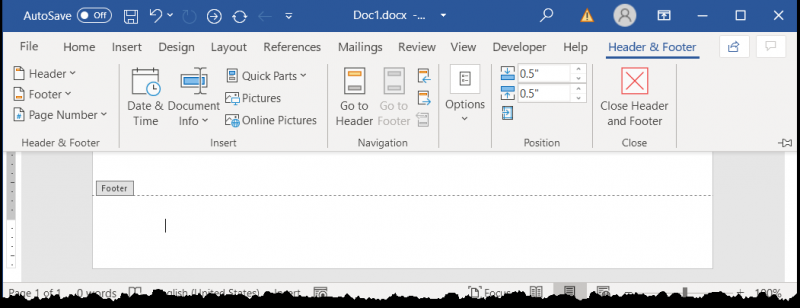
Figure 1. The Header & Footer tab of the ribbon.
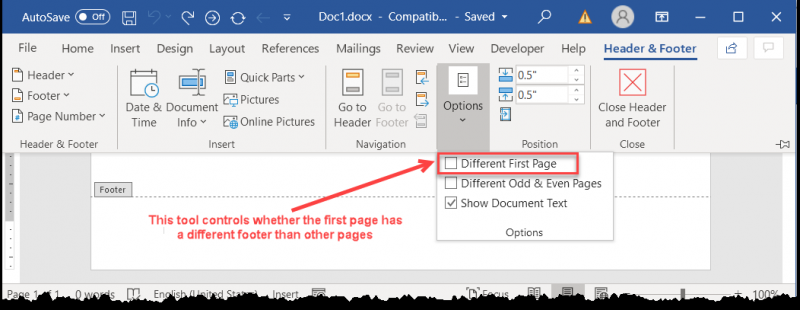
Figure 2. Controlling different footers for a document.
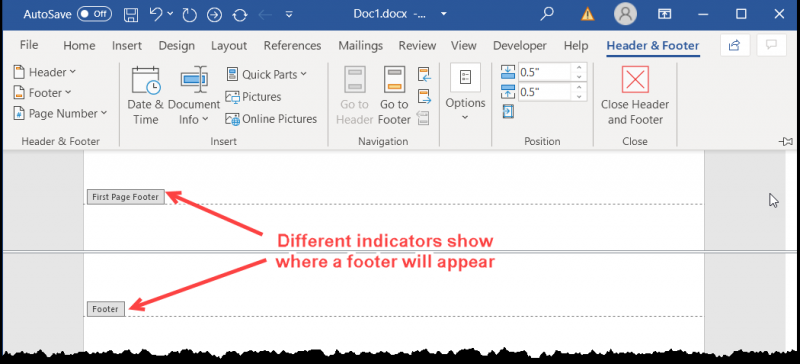
Figure 3. Word indicates where a footer will appear.
That's it; your liability warning will appear on the first page and all subsequent pages will contain just the continuation text.
If you want to switch the scenario so that all the pages contain the continuation text but only the last page contains the liability warning, then things get a bit trickier. The reason is because Word doesn't include a "last-page footer" like it does a first-page footer. Instead, you'll need to resort to the use of fields in your footer to indicate what you want on the last page vs. what is on the other pages. How you do this has been covered in other WordTips.
The steps already described mention putting your liability warning in one footer paragraph and your continuation text in a different footer paragraph. (See steps 8 through 11.) Some people prefer to get a bit fancier with what they enter in the footers and use a table there. This is easy enough to do; Word has no problem with inserting a table in a footer. You could then use different rows, columns, and cells in the table to contain your liability warning, your continuation text, and anything else you want placed there.
Another approach entirely is to remember that headers and footers are an attribute of sections, meaning that each section in your document can have a different set of headers and footers than other sections. So, you could place a section break (of any type) within your document and then define a different footer for the pages before the section break and a different footer for the pages after the section break. The trick is to remember that you need to "unlink" the footer in the second section from the footer in the first section. You do that by following these steps:
- Place the insertion point somewhere after the section break in the document.
- Double-click in the existing footer area of the page. Word "activates" the footer area and displays the Header & Footer tab of the ribbon. (See Figure 4.)
- Make sure the Link to Previous tool, in the Navigation group of the ribbon, is not selected. When it is not selected, the "Same as Previous" wording, visible at the right of the footer area, disappears.
- Change the footer text for each section of your document, as desired.
- Click the Close Header and Footer tool at the right side of the Design tab of the ribbon.
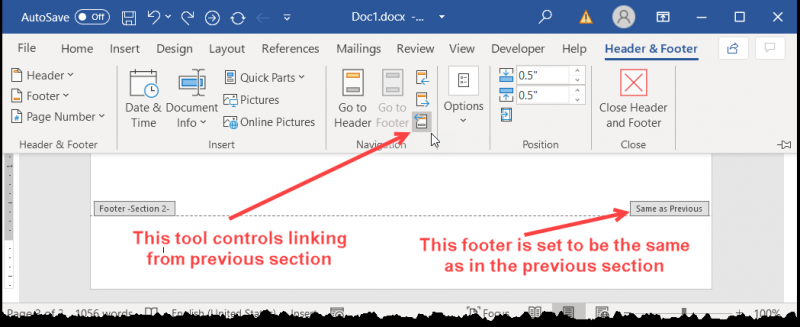
Figure 4. Modifying linkage of footer information.
Of course, things get trickier as you add more and more sections to your document. That is because, again, headers and footers are an attribute of sections, and each section can have a different set of headers and footers. So, if your document has four sections (each delineated by a section break), then you can have 12 different headers (four first-page headers, four odd-page headers, and four even-page headers) and 12 different footers (again, four first-page, four odd-page, and four even-page). It can take some thought to figure out what you want to appear in these headers in your final document.
WordTips is your source for cost-effective Microsoft Word training. (Microsoft Word is the most popular word processing software in the world.) This tip (13249) applies to Microsoft Word 2007, 2010, 2013, 2016, 2019, and Word in Microsoft 365.
Source: https://wordribbon.tips.net/T013249_Multiple_Footers_on_a_Page.html
Postar um comentário for "How to Put Header for Continuation on Page Two"